
Building a React Project - Implementing some important React Features and hosting with Firebase.
An easy step-to-step guide on building & hosting a React Project on Firebase, while implementing SEO, React Router, Pagination, Error boundary & more.


React is a free and open-source front-end JavaScript library used to build fast and interactive user interfaces based on UI components.
In this article, you will learn how to:
Host a React Project on Firebase.
Implement Search Engine Optimisation, React Router, Pagination, and Error Boundary.
Use randomuser.me API.
Create pages: Backend Pagination Page, Page to test Error Boundary & 404 Page.
Note: I am a student at AltSchool Africa, in the Front-End Engineering Track, and this project is my second-semester practical examination, if you would like to read more about this project and also view my codes, kindly check my GitHub Repository.
Prerequisites
Having proven knowledge of React will be an advantage. Regardless, this article will remain beginner's friendly.
The following tools will be needed to work on this project:
You need to have Node installed on your computer, you can get Node at nodes.org.
A Gmail account will be required to sign in to firebase.
A code editor, and for that, I would recommend Visual Code Editor, which you can download at code.visualstudio.com.
Terminal or Command line on your computer.
React App Set-Up
Open your VS Code editor. In your code editor, open your terminal and run the following codes to create a react app.
//create react app, in this case, react-project is our folder's name
npx create-react-app react-project
//to navigate to the project folder
cd react-project
//to run
npm run start
After creating your react app, your folder directory should contain these files and folders.
react-project
├── README.md
├── node_modules
├── package.json
├── .gitignore
├── public
│   ├── favicon.ico
│   ├── index.html
│   ├── logo192.png
│   ├── logo512.png
│   ├── manifest.json
│   └── robots.txt
└── src
    ├── App.css
    ├── App.js
    ├── App.test.js
    ├── index.css
    ├── index.js
    ├── logo.svg
    ├── serviceWorker.js
    └── setupTests.js
You can delete the App.test.js, index.css, logo.svg, serviceWorker.js, setupTests.js files in the src folder.
You can clear out all the codes in the App.js and App.css file.
Then you can create fetchHooks.js file, this file that will hold our react hook codes, and also a pages.js file to hold the main four pages of the project (the home page, user's data page, page to test error boundary and a 404 page).
Our folder should look like this:
react-project
├── README.md
├── node_modules
├── package.json
├── .gitignore
├── public
│   ├── favicon.ico
│   ├── index.html
│   ├── logo192.png
│   ├── logo512.png
│   ├── manifest.json
│   └── robots.txt
└── src
    ├── App.css
    ├── App.js
    ├── fetchHooks.js
    ├── pages.js
    ├── index.js
    └── Pages.js
Packages to install for this project
react-router-domis a fully-featured client and server-side routing library for React. It enables us to implement dynamic routing in our web app. It also allows us to display pages and allow users to navigate them.react-helmet-asyncis a library that helps with search engine optimization by adding meta tags to our pages/components on React.react-error-boundaryis a react component that catches JavaScript errors anywhere in their child component tree, logs those errors, and displays a fallback UI instead of the component tree that crashed.
//install package for react router
npm install react-router-dom
//install package for SEO
npm install react-helmet-async
//install package for error boundary
npm install react-error-boundary
After installing these packages. In the src > index.js file, we can import BrowserRouter from react-router-dom, and HelmetProvider from react-helmet-async. And also wrap our App Component in the <BrowserRouter> and <HelmetProvider> tag.
import React from 'react'
import ReactDOM from 'react-dom/client'
import {BrowserRouter} from 'react-router-dom'
import {HelmetProvider} from 'react-helmet-async'
import App from './App'


ReactDOM.createRoot(document.getElementById('root')).render(
  <BrowserRouter><React.StrictMode>
    <HelmetProvider>
        <App />
    </HelmetProvider>
    </React.StrictMode></BrowserRouter>
)
In the Public > index.html, we need to add data-rh="true" in our meta tag.
//add data-rh="true" to the meta name tag in the head tag
<head>
    <meta charset="UTF-8" />
    <meta name="viewport"
          content="width=device-width, initial-scale=1.0"
      data-rh="true"/>
    <title>Second Semester Exam</title>
  </head>
Hosting project with Firebase
To add our project to firebase, go to firebase.google.com, and sign in with your Gmail account, after signing in, go to the console and click on add project.

Give the project a name (any name of your choice). Note: Do not enable Google analytics (for simplicity) and your project will be ready in ten seconds.
The project dashboard will look something like this. Click on the circled web button </> to select the web app.

Then you will be asked for a name that you want to give your website. Select ‘Also setup Firebase Hosting’, and click on the register app.
Right after that, you will be given a code snippet, you will have to copy and paste the code snippet Into Public > index.html wrapping it in a <script> tag.

After pasting the script into the index.html file.
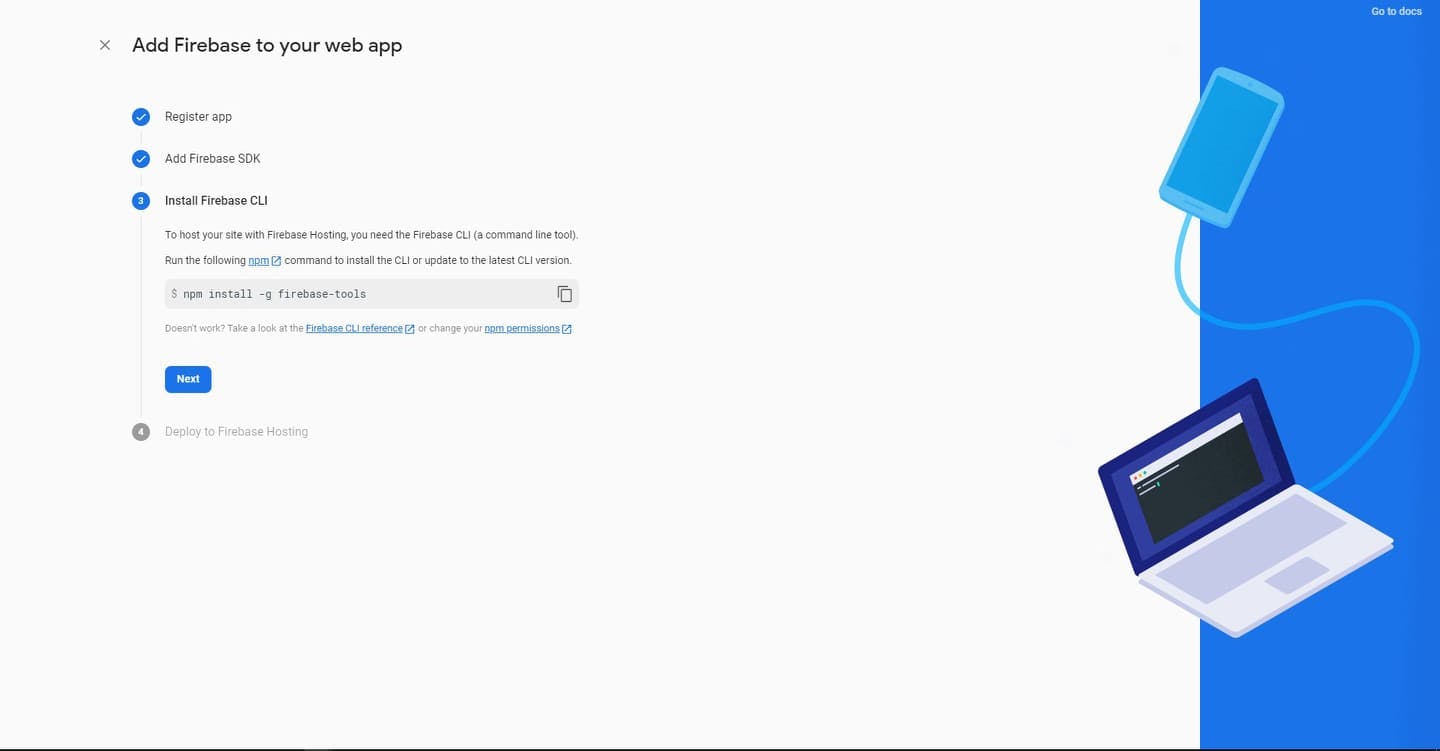
You would back to the firebase and click next. Then, you will need to run the command ‘npm install -g firebase-tools‘. This command will install firebase CLI on your machine.
Now, you will have three codes to run and your project will be hosted on firebase. The first is ‘firebase login‘. Here is where you would be needing your Gmail account.
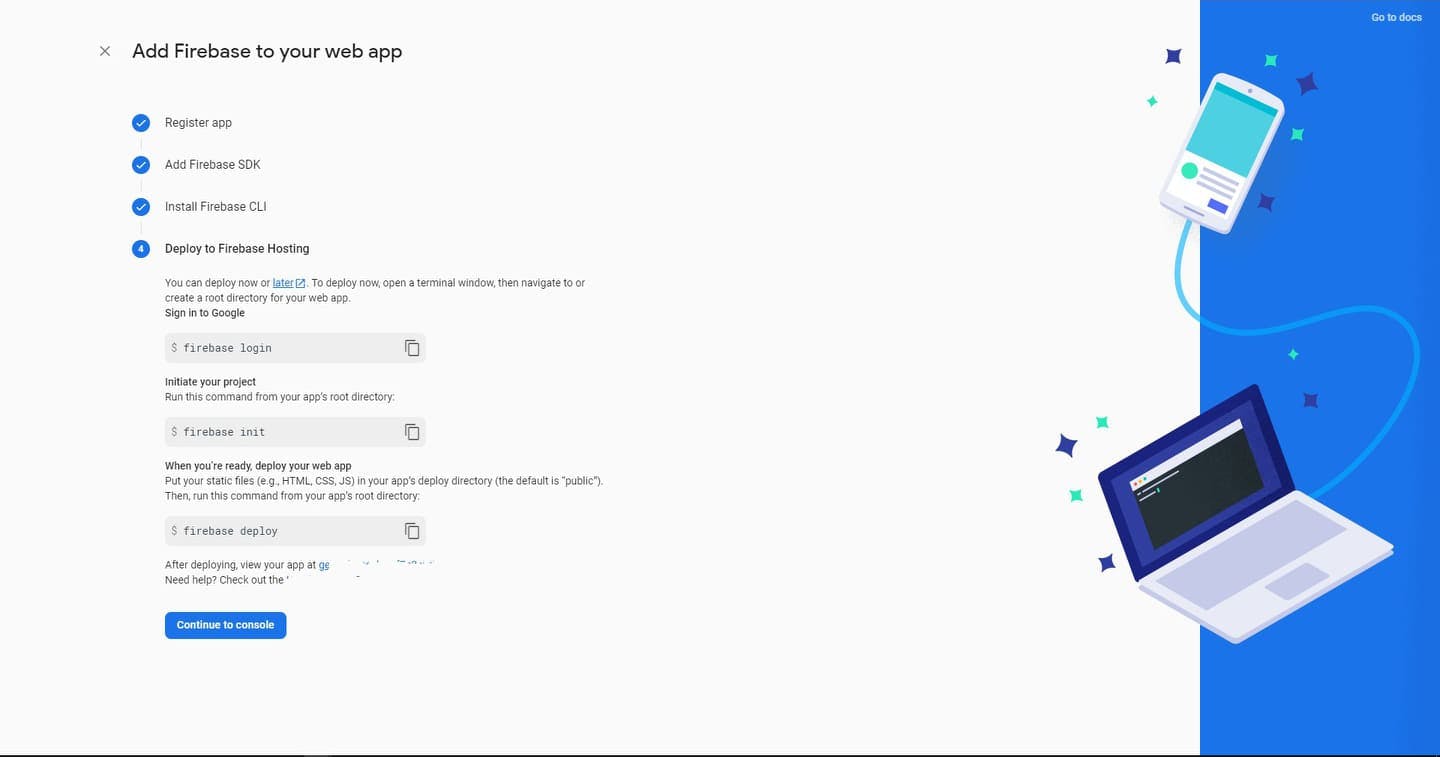
The Second is ‘firebase init‘.
Here, you need to choose Hosting: Configure and deploy Firebase Hosting sites, (by clicking the space bar).
Now, it will ask whether we want to create a project or use an existing one. We will choose the existing one as we have already created the project.

Now, you will be asked what you want to use as your Public directory. That means which folder should host all files of your website. We can use Public as we already have a Public folder in our directory.
Here you should type y (yes) to rewrite all the URLs to index.html, and hit enter.
All the files associated with our website should be in the Public folder.
Now, we have one last command to run ‘firebase deploy‘.
After running this command, all our files get pushed to firebase hosting which will take a minute or two, we will be given a URL to the project console and website.

Implementing our React Hooks
In src > fetchHooks.js file.
import { useEffect, useReducer, useRef } from 'react';

function useFetch(url, options) {
  const cache = useRef({});
  const cancelRequest = useRef(false);

  const initialState = {
    error: undefined,
    data: undefined,
    loading: false,
  };

  const fetchReducer = (state, action) => {
    switch (action.type) {
      case 'loading':
        return { ...initialState, loading: true };
      case 'fetched':
        return { ...initialState, data: action.payload, laoding: false };
      case 'error':
        return { ...initialState, error: action.payload, loading: false };
      default:
        return state;
    }
  };

  const [state, dispatch] = useReducer(fetchReducer, initialState);
  useEffect(() => {
    if (!url) return;
    cancelRequest.current = false;

    const fetchData = async () => {
      dispatch({ type: 'loading' });
      if (cache.current[url]) {
        dispatch({ type: 'fetched', payload: cache.current[url] });
        return;
      }

      try {
        const response = await fetch(url, options);
        if (!response.ok) {
          throw new Error(response.statusText);
        }

        const data = await response.json();
        cache.current[url] = data;
        if (cancelRequest.current) return;
        dispatch({ type: 'fetched', payload: data });
      } catch (error) {
        if (cancelRequest.current) return;
        dispatch({ type: 'error', payload: error });
      }
    };
    fetchData();

    return () => {
      cancelRequest.current = true;
    };
  }, [url]);
  return state;
}

export default useFetch;
Pages for the Project
We will create four pages for this project, and all four pages will have an individual component (the Home component for the homepage, the Data component for the user's data page, the TestError component for the error boundary page, and finally the ErrorFallback component for the 404 page). These components can be written in different files, but for the sake of this project, all the components will be in src > pages.js file.
For SEO and Navigation
We have to write the following import codes into our src > pages.js file, to be able to use our react-hooks, react-router, react-helmet and react-error-boundary throughout our pages.
import { useState, useRef } from 'react'
import useFetch from './fetchHooks'
import {
  NavLink,
  Routes,
  Route,
  Outlet,
} from "react-router-dom";
import {Helmet} from "react-helmet-async"
import { ErrorBoundary } from 'react-error-boundary'
The <Helmet> should be added at the top of each component (Home Component, Data Component, TestError Component & ErrorFallback Component), as shown in the code below.
The <Helmet> will contain:
A
<title>which allows you to give a title to your component, instead of having a general title for all your components.<meta>tag which allows you to specifically give a name and content to a component.
Note: implement this in all other components.
export function Home() {

  return (
    <>
      <Helmet>
        <title>Admin</title>
        <meta
      name="admin"
      content="this is the admin page"/>
        <link rel="canonical" href="/" />
      </Helmet>
    <div>
      <h1>Dashboard</h1>
      <p>Admin Dashboard</p>
      <img src={myImage} width="180px" height="180px" />
      <p> <b>Oyinkansola Shoroye </b><br /> Frontend Engineer</p>
      <Navigation />
    </div>
    </>
  );
}
Now, we will create a component for our projects navigation bar, and we will be using <NavLink> .
A <NavLink> is a special kind of <Link> that knows whether or not a link is “active”.
isActive: returns a boolean value whether the link is active or not, in this case when a Link is active, the color of the link will be white and other links will be black.
function Navigation() {
  return (
    <>
      <NavLink style={({ isActive }) => isActive ? { color: "white" } : { color: "black" }} to="/"> Admin </NavLink>

      <NavLink style={({ isActive }) => isActive ? { color: "white" } : { color: "black" }} to="/data">Data </NavLink>

      <NavLink style={({ isActive }) => isActive ? { color: "white" } : { color: "black" }} to="/testerror"> Test Error </NavLink>

      <NavLink style={({ isActive }) => isActive ? { color: "white" } : { color: "black" }} to="/error"> 404 Page </NavLink>
    </>
  );
}
Creating the user's data page
We would set up backend pagination using randomuser.me API. We would show the necessary navigation, its accessibility and the disabled state.
export function Data() {
  const [page, setPage] = useState(1);
  const { loading, error, data } = useFetch(`https://randomuser.me/api/?page=${page}&results=10&seed=abc`);
  const pages = 20;

  if (loading) {
    return <>Loading...</>;
  }

  return (
    <>
      <Helmet>
        <title>User's Data</title>
        <meta
      name="user's data"
      content="A list of user's data"/>
        <link rel="canonical" href="/data" />
      </Helmet>
      <h1>User's Data</h1>
<div className='info'>
  <p>First name</p>
  <p>Last name</p>
  <p>Age</p>
  <p>Gender</p>
  <p>Username</p>
  <p>Password</p>
</div>
      {data?.results
        .map((each, index) => {
          return (
       <div className='info' key={name.toLowerCase().replaceAll(' ','')}>
              <p>{each.name.first}</p>
              <p>{each.name.last}</p>
              <p>{each.dob.age}</p>
              <p>{each.gender}</p>
              <p>{each.login.username}</p>
              <p>{each.login.password}</p>
         </div>
          );
        })}

      <p> Pages: {page} of {pages} </p>
      {
        <button role="button"
          aria-pressed="false"
          tabindex="0"
          disabled={page <= 1}
          onClick={() => setPage((prev) => prev - 1)}>
          prev
        </button>
      }

      {Array.from({ length: pages }, (value, index) => index + 1).map(
        (each) => (
          <button role="button"
            aria-pressed="false"
            tabindex="0"
            onClick={() => setPage(each)}>{each}
          </button>
        )
      )}
      {
        <button
          disabled={page >= pages}
          aria-disabled={page >= pages}
          onClick={() => setPage((prev) => prev + 1)}>
          next
        </button>
      }
      <Navigation />]
      <Outlet />
   </>
  );
}

Creating a page to test Error boundary
We are going to create a page to test errors.
Once the wrong password 'incorrect' is typed into the input field, an error will be displayed below it with two links provided, one to go back to the homepage and the other link to clear the error.
export const Testerror = () => {
  const [username, setUsername] = useState('')
  const usernameRef = useRef(null)

  function Testerror({ username }) {
    if (username === 'incorrect') {
      throw new Error('')
    }
    return ``
  }

  return (
    <div>
      <Helmet>
        <title>Test Error</title>
        <meta
      name="test error"
      content="this page is used for testing error" />
        <link rel="canonical" href="/testerror" />
      </Helmet>
    <label>
      <p> Wrong password is <b>'incorrect'</b></p>
      <input placeholder={`enter the wrong password provided above`} value={username} onChange={e => setUsername(e.target.value)} ref={usernameRef} />
    </label>
    <ErrorBoundary
      FallbackComponent={ErrorFallback}
      onReset={() => {
        setUsername('')
        usernameRef.current.focus()
      }}
      resetKeys={[username]}>
      <Testerror username={username} />
    </ErrorBoundary>
    <Navigation />
  </div>)
}

function ErrorFallback({ resetErrorBoundary }) {
  return (
    <div role="alert" style={{ lineHeight: "40px" }}>
      <p>⚠️</p>
      <p>Looks like there was a problem</p>
      <div>
        <p>
          <NavLink to="/">
            <button>Go to Admin Page</button>
          </NavLink>
        </p>
        <button onClick={resetErrorBoundary} >Try Again</button>
      </div>
    </div>
  )
}

Creating the 404 page
Now, we are going to create a fallback UI for our Error boundary, in the UI we have added useful links that will help the users get to a defined URL.
const Errorpage = () => {
  return (
    <div>
      <Helmet>
        <title>404 Error</title>
        <meta
      name="404 Error"
      content="an error occurred"
    />
        <link rel="canonical" href="/error" />
      </Helmet>
      <p> Oops!</p>
      <p> We can't seem to find the <br /> page you're looking for.
      </p>
      <p> Error code: 404 </p>
      <p>Here are some helpful links instead:</p>

      <NavLink style={({ isActive }) => isActive ? { color: "white" } : { color: "black" }} to="/"> Admin </NavLink>

      <NavLink style={({ isActive }) => isActive ? { color: "white" } : { color: "black" }} to="/data"> Data </NavLink>

      <NavLink style={({ isActive }) => isActive ? { color: "white" } : { color: "black" }} to="/testerror"> Test Error </NavLink>

      <NavLink style={({ isActive }) => isActive ? { color: "white" } : { color: "black" }} to="/error"> 404 Page </NavLink>
    </div>
  );
};
And here is our result! The UI below will be displayed instead of the component tree that crashed when a JavaScript error anywhere in their child component tree is caught.

React Router
Routing is a process in which a user is directed to different pages based on their action or request.
The Home Component route does not have a path because it has an index attribute. We specify this route as the default route for the parent route, which is /.
The other <Route>s inherit and add to the parent route. For example the testerror the path is combined with the parent and becomes /testerror.
Setting the path to * will act as a catch-all for any undefined URLs. So we are using it for our 404 error page.
function Path() {
  return (
    <>
      <Routes>
        <Route path="/" element={<Home />} />
        <Route path="/testerror" element={<Testerror />} />
        <Route path="/data" element={<Data />}>
          <Route path="out" element={<Myout />} />
        </Route>
        <Route path="*" element={<Errorpage />} />
      </Routes>
    </>
  );
}
export default Path;
The App.js file
All the stylings are done in the App.css file and we have to import it into the App.js file, we also have to import Path Component from pages.js file.
import './App.css'
import Path from './pages'

 function App() {
  return (
  <>
     <Path />
  </>
  )
}
export default App
Conclusion
Thank you for reading! I hope you found this article helpful.
We have learned how to create a React App, how to host a React Project on Firebase, how to use react-router, how to fetch and use an API (randomuser.me), how to implement error boundary, how to use react-helmet for SEO and how to create page navigations showing its accessibility and disabled state.
Attributions
Hats off to the amazing tutors that taught React at AltSchool Africa School of Engineering > Setemi Ojo, Desmond Nyamador & Maye Edwin.
Bolaji Ayodeji's Technical writing template & Didi's awesome lectures on Technical writing.